Posted on November 30, 2023
Adding wordpress to github
Here are my setup notes for adding my wordpress to github so I could have some peace of mind. Embarrassingly, having worked for Meta over a year now and using Mercurial strictly through the UX in VSCode, I found that I had forgotten how to setup repos in git, which made things harder than it should have been.
Note that I currently use GoDaddy, which provides a UX in Cpanel admin for adding git repos. However, it didn’t quite suit my use case (more info at the end)
Note: These notes are for setting up in GoDaddy hosted server, which already has git installed. If that’s not the case, you’ll have to run the appropriate commands to install git. Something like the following to update package manager (obviously depends what package manager the host is using) and then install the git package:
sudo apt update && apt upgrade<br>sudo apt install git- Create a Repo on github.com/new. I found that leaving “Initialize this repository with” blank made things a lot easier. You can always create the README and .gitignore in the initial or subsequent commits. Otherwise, you’ll need to clone the repo onto your working directory. For this use case, that would be the wordpress www folder, which is not empty.

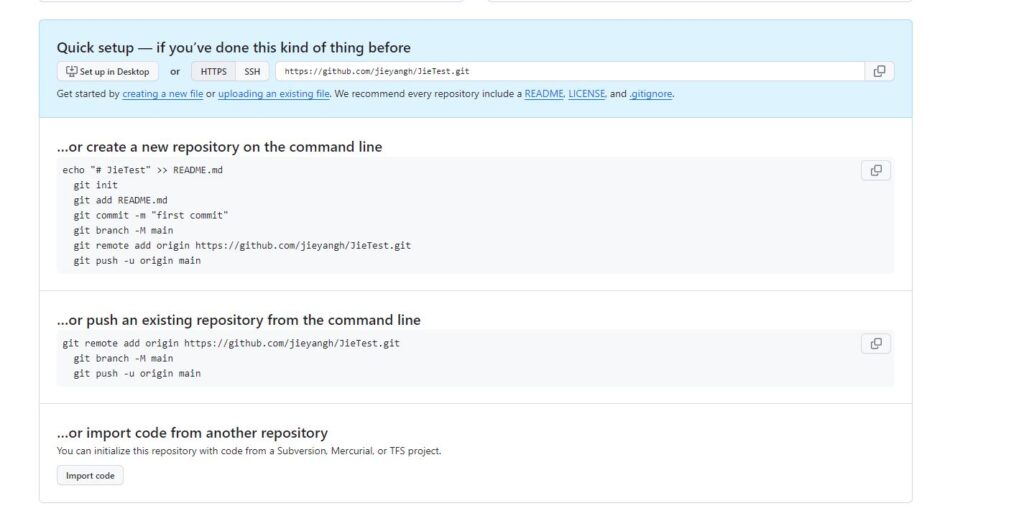
2. Assuming you did not populate “Initialize this repository with”, the github UX then provides easy copy pasta commands for creating a new repo from the command line:

3. Ssh onto your host. Funny enough, I was on my windows desktop PC and not my work laptop (Mac), and it had been a while, I had completely forgotten what terminal program to use for ssh. I downloaded putty, but git bash supports ssh onto hosts as well, which has better copy/paste UX.
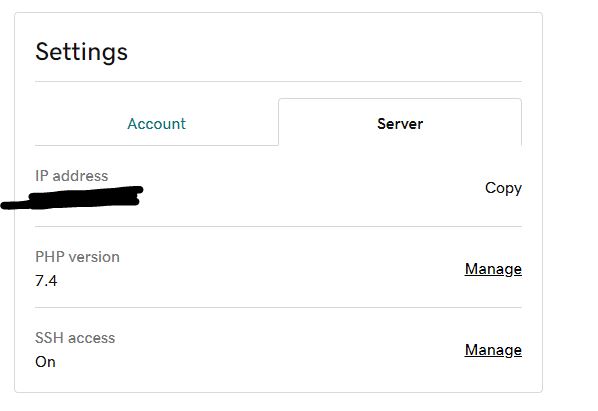
From GoDaddy you can access the ssh settings via “SSH access” under server tab by clicking your account name in the upper right, selecting “My Products” and navigating to Hosting and then your website.

4. Run the commands from the UX for “create a new repository on the command line”.
The github UX will provide the exact copy paste. The key command here is:
git remote add origin https://github.com/{username}/{repo}.git
5. Note this uses https for settings up the repo, so no need to do all the work settings up ssh keys. However you will need to provide username and password when you actually try to push to origin. You can not use your actual password, so if you haven’t already, you’ll need to set up private access token on github. See the section on “Private Access Token (classic)” here. Once its created, you use that in lieu of your actual password
6. Add a .gitignore for wordpress. This is the official one from github. I actually removed the line for uploads, since if I ever want to move hosts, the images (which are very small png and shouldn’t pose any issues for git) will come along.
7. Add a README
8. All done! Now you can clone to your local working directory
Issues I ran into
- Ran into error message when pushing to remote: We will no longer accept passwords as a way to authenticate your command-line Git operations.
As mentioned above in step 5, I had to set up a private access token. - When adding remote origin I got error:
fatal: remote origin already exists.
Thinking it already existed, I pushed but got:
error: src refspec master does not match any.
I believe this happened due to trying to use the repo setup via GoDaddy first. The simplest fix was to run:
git remote rm origin
Then I reran the following commands and this time everything went smoothly:
git remote add origin https://github.com/{username}/{repo}.git
git push -u origin main
Why I didn’t use the github UX in GoDaddy
Godaddy actually provides git managements in the cPanel UX, under “Files” section

However, the UX didn’t quite suit my use case. First I tried to clone the repo I had already created on git into www, but it errored out saying there were already files. So then I unchecked “Clone repo” toggle.

This will create the repo, however, the repo is not created under your git account (there is no option for this), which was not ideal. The commands for git add origin all reference the user on the wordpress host itself. Since I want my website under my own github private repo, this was a non starter. Let me know if I’m missing anything, because it wasn’t obvious to me how to set this up in the UI.

