Posted on May 23, 2011
Quick and dirty table import hack for SQL Server
Every so often, I’ve needed to import data from the QA/Staging database table onto my local machine to help troubleshoot a hard to repro bug. Typically, I only need to import a few table’s worth of data, so creating a backup of the QA database and restoring it on my local machine is overkill. Here’s a simple trick to do so quickly and painlessly, without needing to click through the tedious export/import wizard or open up a command line to run BCP (and invariably having to look up the BCP syntax).
Open up SQL Server Management Studio and connect to the QA database in question. Open up a new query, and run a SELECT * FROM [TableName] query. Click on the results pane, and then Ctrl-A Ctrl-C to select everything and copy the data. Shown as an example here is the AdventureWorks.Person.Address table (obviously truncated as it contains almost 20,000 rows):
Disconnect from the QA database and reconnect to your local database. Open up a new query window and run TRUNCATE TABLE [TableName] to wipe out existing data. If necessary, you can back up this data, but since this is data on your local machine, chances are you won’t really need to. If you have any columns with the identity property, things will get trickier. Your best bet is to right-click the table in the object explorer, SCRIPT TABLE AS -> CREATE TO -> NEW QUERY WINDOW. From there, edit the automatically generated query by removing any IDENTITY properties (along with any foreign key constraints). DROP the table, and then run the creation script to recreate the table sans any Identity columns.
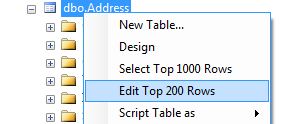
Now, navigate to the table using the Object Explorer and right click the table you want to import the data into. Select Edit Table:
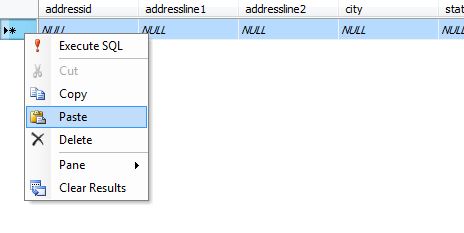
Right click the arrow to the right of the first row and select Paste: 
The rows will now show up. You may now close the window (the data is saved automatically):
Yes, its really that easy. SQL Server is even smart enough to preserve the NULL values in varchar columns (as opposed to treating them as a string with the value “NULL”). Note that you can also use this same method to back up and restore your data by using an Excel spreadsheet as an intermediary backup file. Select all the data in the table and copy it as before. This time, paste it into an Excel spreadsheet. Excel will automatically detect and preserve the columns:
Later when you want to restore your original data, select and copy all the data from the Excel spreadsheet and paste it back into the table using the “Edit Table” method outlined above.
Obviously, this operation gets slower the more data there is to copy. After a certain point, it’d make more sense to use a more robust method, such as BCP. However, when it comes to programming, laziness is a virtue, and this is one of the fastest and easiest ways to import data.


